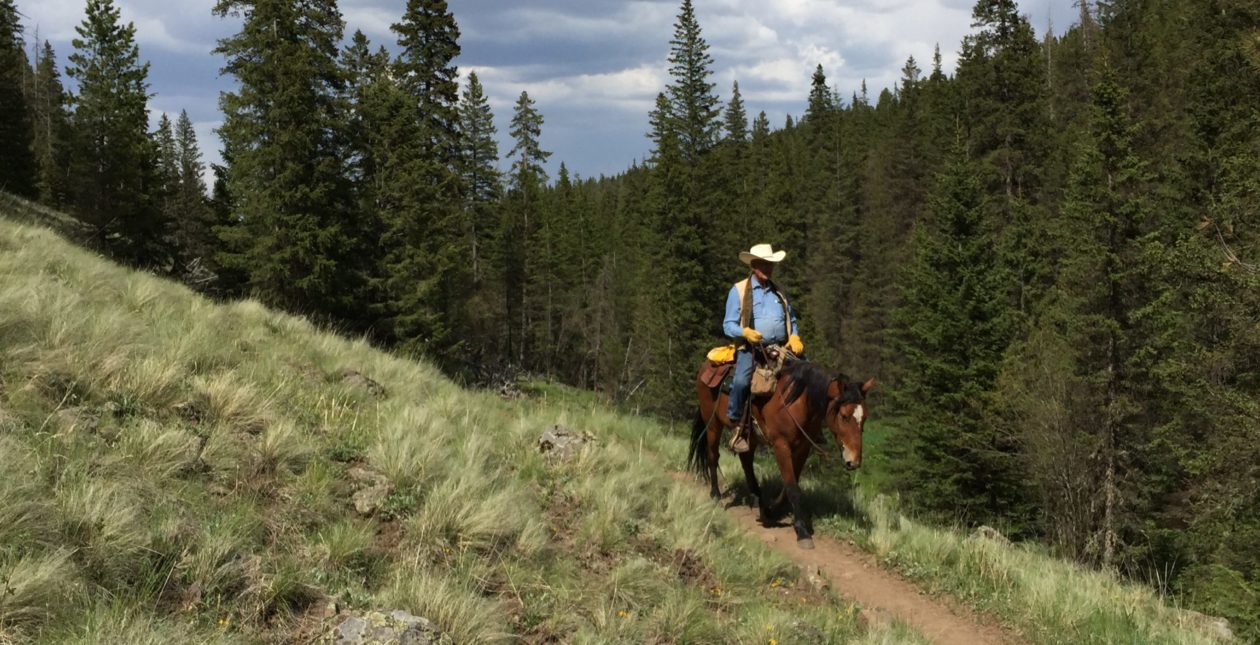
I took Ranger out this afternoon for a training ride. We worked on his gaits, neck reining, controlling his hind and front quarters, backing, stops, and general paying attention. How do you like my training arena?
I found an old abandoned gravel pit not far from where I keep Ranger. It makes a great place for me to work on his mountain trail skills as well as his control skills. So far he’s been impressive. He is extremely sure-footed, quite strong, and very athletic. There are a lot of places to work on steep ascents and descents and the terrain is quite rocky, which will toughen up his hooves. There are also a few long ascents on which I can work on improving his strength and endurance. It’s the perfect training arena for me.
I have been working on keeping his attention focused on the trail ahead of him. He is still suffering from a bit of buddy and barn sour-itis, so I find him often looking in the direction of home and veering off in that direction without a cue from me. When he does that – and I mean even the slightest look in that direction – I pull him into a tight circle with pressure both on the bosal and leg pressure, and sometimes with a touch of the spur. He’s doing a lot better now. There are few things I like less than a horse that is constantly wandering from side to side on the trail, because he’s trying to look toward home or his buddies. I don’t mind a horse that looks around a bit, as long as he stays on the trail and going the direction I point him. I very much enjoy riding a horse that is interested in the trail ahead as much as I am and worries as little about the trail behind him as I do.
I used spurs on Ranger for the first time today, to see how he would react with them. He surprised me by showing that once upon a time he received some good training, probably only 30 days or so when he was two or three, but good training nonetheless. I found that he responded to cues with the spurs that he hadn’t quite figured out just with my heels. Not that he wasn’t responsive with my heels, just that he didn’t recognize what I wanted and it was like teaching him from the get-go. With the spurs he quickly started remembering his former training and I was able to get him to move his fore and hind quarters very well, much better than if I were just starting to teach him. It will still take a bit of work to get him to pick it all up again, but it was obvious he was remembering things from former training. That was a pleasant surprise.
We also worked a bit on trailer loading. I have started working on that at the end of every ride. Seems that he is more in a training mind-set when we get back than when we start. After the ride, once I load him into the trailer I feed him a little and let him rest while I brush him. He is beginning to be much less resistant. I think another week or so will have him walking into the trailer unassisted, which is what I’m looking for.
On the trailer training, I found the resistance-release method works best with him, particularly since I have no helpers. With his halter on and a 12′ lead, I may work on yielding his hind quarters and doing a few other simple exercises to get him focused on me, paying attention, and being obedient. Then I will walk into the trailer, expecting him to simply follow me in (I have a 4-horse slant-load). When that doesn’t happen, from inside the trailer I put fairly heavy pressure on the lead, but not enough to make him want to pull back, and kiss to him, which is my “move” cue for him. Within a couple minutes he will get tired and take a step forward. When (not “if”) he takes that step, no matter how small, I immediately release all pressure an give him a scratch on the forehead and a pat on the neck, without allowing him to back up that step we just gained. I then repeat the process as many times as necessary until I have him stepping into the trailer. It takes patience and persistence. You cannot release pressure until he complies, even a little bit, or you will defeat the training. Also, as the training progresses I require a little more compliance each time, on his part, before releasing pressure. I don’t want him to learn that minimal effort is all that I require.
One other thing I learned today about Ranger. He is so short-coupled that when we are ascending a steep trail, I have to pull my heels back and up out of the way or my spurs will hit his stifles. He really pulls those back legs up under him when he’s ascending. Never had that happen with a Quarter Horse.
Today’s ride was a nice one and I thoroughly enjoyed it. Temperatures were in the 40s and no breeze at all. It was nice. Ranger and I are starting to figure each other out and his training is progressing well.
Sorry that I have let the forums go for so long. Last year I let it go because it was getting little use and it took huge amounts of time to administer. I just couldn’t keep up with it.
It wasn’t the users who were the problem, but the spammers. I finally installed a good anti-spam plugin, but by then I had other problems with the software. After a couple of updates to WordPress, things on the phpbb forum got goofy. I spent untold hours trying to figure it out, but couldn’t, so I just let it go.
I started trying to look into it again this week and was discouraged to see that I got hit with another round of Russian and Chinese spammers. I have spent the past two days deleting more than 4,500 spam comments and over 1,500 spam users from the forum, all of whom hit since about mid-December 2014. On top of that, I still can’t get the integration between phpbb and WordPress working.
I looked for help this morning, after getting the spammers cleaned up last night, only to find that the integration plugin WP_United has been abandoned. Their support forum hasn’t been maintained since about last May and even their forum has been taken over by spammers.
So, I’m looking for other software to try to integrate the forum, gallery, and the main WP website.
I’ve installed a plugin that is supposed to allow integration of the memberships of the website and the forum, such that registering on one automatically registers you for the other, but I’m not sure whether it’s working, or even whether I have been able to successfully remove WP_United, and I don’t know whether it even recognizes the Coppermine photo gallery. So, we’re in a rebuilding stage.
I may end up having to completely take down the forum, and maybe even the website, and install new software altogether. Hopefully I’ll be able to save the information already posted, because there is some good information there.
Sorry for the inconvenience. Had I know this was going to be such trouble and such a time-sink when I started it, I don’t think I would have even attempted. I figured it would be a good learning experience and be good exercise for my gray matter. I find that nowadays it’s not the learning that is difficult, but the remembering what I learned from one day to the next.
Still, I’m trying. I still believe there could be value in this website and forum for those of us who enjoy spending time out on the western trails for pleasure, as well as for those with business interests – those who make their living as guides, suppliers, and outfitters. The vision was to make this website a clearinghouse for information specific to horse and mule packing in the western United States, whether for people who like to go it on their own, like I do, or to get those who would rather have a guide and outfitter in contact with people who can supply their needs.
It may never get there, but it won’t be for lack of trying on my part.
Thanks for following along through this ordeal. I’d much rather be out riding my horse in a snow storm than sitting in front of this computer trying to make sense of software programming.
Now that my wife and I are settled in a house here in Salem, Utah, I have been able to get at least some of my tools out of storage and into my little workshop out back. Some of the first things I brought are my saddles and leather working tools.
A couple weeks ago I finished the work on my old Bighorn saddle, which needed to have the horn tightened up, new fleece, and new saddle strings. I finished that project and put the saddle immediately back to work on my new Missouri Fox Trotting Horse, Ranger. After having my last horse, Penny, beat my good Hamley Ranch Saddle to pieces, I decided that the Bighorn saddle was going to be my breaking and training saddle from now on.
My 1947 Hamley Ranch Saddle, ready for repairs
Last week I got to looking at my old Hamley and decided it was time to start the repairs.
The saddle was in need of new saddle strings, new rear rigging leathers, new stirrup leathers, a new cantle binding, and possibly new fleece, as well as repair to a tear on the front left side of the seat jockey. I also need to soak and flatten both the rear jockeys and the skirts, as they have curled up pretty badly.
Just so you know why I didn’t just sell the old saddle, or hang it up for decoration, this particular saddle came to me from my wife’s family. It belonged to her uncle, Earl Richins. I got it because there was no one else in the family who would get any use from it. A couple years ago I contacted Hamley, which is still in business in Bend, Oregon, about the saddle. For a nominal fee, they took the saddle’s serial number and researched their files. They provided me with a Certificate of Authenticity for the saddle, which showed the saddle was made for Earl G. Richins, who paid $154.50 for it in 1947. It is a family heirloom and I intend to continue passing it down. I also intend to make it mine and hope that whomever I pass it to will make it theirs and use it as well. I’ve no use for a decorative saddle.
A little over a year ago I had a mare that was prone to panicking. She would occasionally just go bananas if I got her into a position where she didn’t understand what was happening and felt trapped. While working with her one day, trying to teach her to sidle up to a gate, so I could open it, she went berserk. She went back, fell over, lunged up, crashed into the gate, then over again she went. Then she jumped back up and crashed into a fence where a tree was overhanging. I had come off the first time she went down, so I was just standing by watching the rodeo, waiting for her to get finished with her tantrum. After crashing through the tree branches, she finally stopped and settled down. I went to her to make sure she wasn’t hurt, which she wasn’t, just a little shaken up. However, my saddle was another story completely.
When I got over to Penny, I could see a stick about the diameter of my thumb sticking out of the cantle binding of my precious antique Hamley saddle. Not only that, but as I checked for further damage, I found both rear rigging leathers about to tear away from the cinch ring, a large new scrape on the pommel, and a scratch across the cantle, where my spur had raked as I came off. It was only a day or so later that one of the stirrup leathers gave out and broke. So my Hamley was out of commission. After evaluating the work that would be required to “restore” the saddle to “collector” condition, I decided that it was simply out of my price range. Judging by what I have priced at Hamley and other saddlers, it would run in the area of $3500 to have the saddle restored. I decided that I would do the repairs myself and bring the saddle back to usable condition. I decided that as an aspiring saddle maker, this would be an excellent learning experience. While some may criticize me for learning on my Hamley saddle, in my opinion it was simply too far gone to be worth the expense of sending it back to Hamley for repair/restoration.
So, here I am about ready to do the repairs. By this time I have acquired most of the tools necessary for saddle making. I still lack some of the more expensive gadgets, such as a leather splitter, and I could always use a few more punches and strap-end cutters, but I have enough to do what must be done on the Hamley.
Last week I started on the repairs. I started by disassembling the saddle, as much as was necessary, so I could take a good look and evaluate all that needs to be done. Turns out the tree, a bullhide-wrapped wood tree, is in excellent condition. I was surprised to find that Hamley uses bronze stirrup hangers, rather than having the stirrup leathers pass over the saddle bars. The tree is solid as the day it was made and the bars are in good condition. I removed the old saddle strings, pulled the few nails holding the skirts to the bars, then removed the skirts. I removed the rear jockeys, then the rear rigging leathers. The stirrups had been removed months ago. The last thing I removed was the cantle binding. I pulled the seams loose and cut the threads with a sharp knife. I used a pair of pliars to remove the remaining thread from the stitching holes in the cantle. Click on an image for a slide show with the photos in full-size.
I decided the first project would be the cantle binding, as I dreaded it the most. The cantle binding is one place that really shows the craftsmanship, or lack thereof, of a saddle maker. This was to be my first cantle binding and I didn’t expect it to come out perfect, but I hoped it would come out well.
I started by reading up on the topic in the reference books I have bought along the way, including the three-volume set by Al and Ann Stohlman and another book by Davy Jones on saddle making and repair. I decided to follow the directions given by the Stohlmans.
I cut the new cantle binding out of 7/8 oz skirting leather, making the piece about 1-5/8″ wide by 30″ long, which were measurements I took off the saddle itself. I then made a stitching groove along both edges, about 1/8″ from the edge, as this would be a binding with exposed stitching on both the front and back. I edged and buffed the edges and skived the ends thin. I then soaked the binding in luke-warm water for a few minutes, until it stopped bubbling. After stripping off the excess water with my fingers, I put the binding into place on the cantle, stretching it tight and placing a 1/2″ #12 tack at each end, down under where it would be hidden by the seat jockey. I formed it as much as possible with my fingers, so that the edges fit nicely into place on the cantle where the old binding had been. I then let the binding sit until almost dry, going back and forming it with my fingers now and then as it dried.
Before the binding was completely dry (you want some moisture left in the leather), I removed it and finish trimmed the long end to fit properly, then re-skived that end. I applied rubber cement liberally to both the cantle and the cantle binding, however, as directed by the Stohlmans, I did not apply rubber cement to the very front portion of the underside of the cantle binding, so that it could be adjusted easily as it was put into place on the cantle. I then carefully placed the cantle binding into place on the cantle, working it into place with my fingers. A rub stick would have helped as well here, but I didn’t have one available. Both ends were tacked into place with two tacks. These will remain permanently.
At this point I ran a #5 overstitch wheel over the binding in the stitching groove to mark where I would cut the stitching holes with the awl. I then threaded two #517 stitching needles and sharpened my awl and went to work. I found right away that it is critical to have a good awl blade and have it razor sharp. There is a talent that is developed in using an awl. I got better as I went, but my first few holes through that thick cantle leather were difficult. I had a hard time getting the awl to penetrate perfectly straight, as I kept applying pressure that was not perfectly straight. I bent my awl blade slightly several times. Once bent, you just cannot straighten an awl blade perfectly. I was able to straighten and resharpen the awl blade enough that it worked, but I had difficulty in getting the awl to penetrate straight and emerge on the backside right where I wanted it to – in the stitching groove. I would watch to see where the blade was going to emerge, then I would pull it back and adjust until it emerged where I wanted it to.
I only got about 1/3 done on the binding that first evening, because there wasn’t enough light in the work area. I just couldn’t see well enough to see where the tip of the awl was emerging and I was tired, so rather than risking a major mistake, I left it for the following day.
When I got back to the project, of course the binding had dried out completely. I decided to try stitching with it dry, as I didn’t like the way it came out while working on it damp. I found that when the leather was damp I tended to tighten the stitches too much and the leather would bunch a little, making the work look a bit rough. I found that when I stitch with the leather dry I liked the look better.
One saddle maker, Dusty Johnson, recommends drilling the stitching holes with a Dremel-type high-speed tool. He told me that by drilling the stitching holes, rather than cutting them with an awl, he is able to complete the stitching on a cantle binding in a matter of a half-hour, rather than about two hours with an awl (it took me much longer). I used Dusty’s technique to make my chaps and I find it makes my stitching look much more professional. I may try that the next time, but I was afraid it would show up on this binding where I changed methods. I finished the cantle binding stitching with an awl and with the leather dry.
Another thing I am learning, slowly but surely, is to be consistent and apply the correct amount of pressure when I tighten each stitch. Toward the end of the stitching I pulled two stitches through the binding leather. They are visible if one looks, but not bad enough that I would tear it all off and start over…at least not on this saddle. All I can guess is that I came upon a weak area in the binding leather in that place, as I applied no more pressure there than anywhere else on the binding. It is possible I was applying too much pressure all along in tightening my stitches.
I also found I tend to mark my cantle binding with my fingernails and tools as I stitch. This is something I really need to pay attention to , especially while working damp leather. Anything with an edge or corner that touches damp leather will leave a permanent impression. This is not a problem on this saddle, because it’s going to get a lot of marks on my pack trips anyway, but if I were doing this as a gift or a commission, it would look pretty poor. It gives my work a used look when it is brand new.
At the end of the stitching I learned another thing. I did not pay enough attention to the angle at which I was inserting the awl while stitching around the binding. I ended up finishing the stitching on the front, but still lacked nearly 1/2″ in the back. I ended up creating another two stitches in the back, running them through existing stitches in the front, while creating a lock-stitch at the same time.
I will likely stain the cantle binding to try to get it closer to the color of the old original leather. I haven’t yet decided whether to do that or just let it age naturally with neatsfoot oil.
All-in-all, while I am not completely pleased with the appearance of my work on the cantle binding, I know it will be serviceable and it was an excellent learning project. I am sure my next cantle binding will reflect improved craftsmanship on my part. Below is a gallery of all the pictures I took for this post.
Last Monday I was invited by Jon Tanner to join him for a New Year’s Day ride with the local chapter of the Missouri Fox Trotting Horse Breed Association (MFTHBA) at Antelope Island State Park. It didn’t take me long to clear it with my family and jump on board. We agreed that I would haul my horse up to pick him up and the two of us would head over to Antelope Island, a short drive from his place. In the end we invited my son-in-law, Scott Palmer, and Michael George, a friend of Jon’s, as well.
16″ of snow on top of the horse trailer
I got up at 5:30am, after a late evening – New Year’s Eve, you know – showered, made myself a breakfast, then headed over to pick up my horse and trailer in the dark. I had the forethought to prepare my trailer the day before, having shoveled off the 16″ of snow on top of it and made sure I had everything I needed already in it. I had also pulled it out of the pasture where it is being stored and the landowner had cleared a path in the snow with his tractor, so I could make an early departure without having to dig out.
I easily hitched up the trailer. Catching up Ranger in the dark, though, was another problem. The day before, the landowner had offered to feed Ranger an extra bait of hay early, so he would have something to go on during the ride. I asked him not to, so that Ranger would be hungry in the morning, so I could more easily catch him in the dark. I figured to feed him alfalfa cubes and a little sweet feed in the trailer anyway. I used grain in a bucket to help me catch him. On the third try he let me get the rope around his neck. Seems like he always lets me catch him on the third try. We’re going to have to work on that. Anyway, I caught him up, and after a little persuasion, was able to load him in the trailer. We’re going to have to work on that, too.
By 6:40am I was headed over Spanish Fork to pick up Scott. He was ready, so we didn’t waste time. By 7:00 we were headed for Pleasant Grove to pick up Scott’s horse. His horse, a 16-hand Tennessee Walking Horse (TWH), was easy to catch and load, so by 7:50am we were heading for Kaysville to pick up Jon and Mike. We got to Jon’s a bit earlier than anticipated, so we waited there a few minutes for Mike to get there. Mike borrowed one of Jon’s Fox Trotters for the ride. We had Jon’s horses loaded and were moving out by 9:40am, headed for the park, which was just a short 30 minute drive from Jon’s place. Upon entering the park, there is a guard shack, where the park fee of $10 per vehicle is collected. We arrived at the White Rock Camp Ground parking area about 10:10am. Upon arrival we found the parking lot filling up with trailers and lots of riders heading out for the trails. I would guess there were upwards of 50 riders, representing several horse and mule associations, as well as some folks just out for a ride.
By 10:30 we were saddled and heading out on the trails. We grouped up with several others on Fox Trotters and headed out at a pretty good clip. At first, Ranger had trouble keeping up, moving from a fox trot to a pretty choppy trot. I worked to keep him in the fox trot and trying to encourage him to stretch out his stride to get a faster clip. Meanwhile, Scott’s horse, Bandit, the Walker, was a bit excited and Scott was working to keep him settled. He and I ended up getting a bit behind our group. It took us about a mile to catch up with them. During that spread, Ranger started to get his gait in order and move at a faster clip, while keeping his fox trot, with which I was very pleased.
During the ride we saw several buffalo, for which the island is famous. Each year the park service holds a roundup and auctions the excess buffalo in order to keep the population in check. The park service allows the general public to participate in the drive. I am told one has to register at least four months in advance nowadays, and that the roundup has become such a popular attraction that people come from all over the country to participate. I am also told that the day of the roundup has become somewhat of a circus, due to the participation of some 300 or so riders of widely varying experience levels, both human and equine. Accidents and injuries during the round up have become something to be planned for by the park service. According to Jon, it seems that every year there are several riders and horses injured by charging buffalo.
In the upper left, if you zoom in, you can see a small herd of buffalo
We also saw a small herd of bighorn sheep, a coyote, and several upland game birds. The island, of course, is also know for its Pronghorn, also know as American Antelope. We saw none on this ride, but there is a substantial population of them on the island.
The use of the trails on the island is strictly regulated by the park service. As usual in a state park in Utah, as well as other states, dogs are allowed on leash only. Riders, hikers, and bicyclers are restricted to travel only on the designated trails, departure from which can result in a fine. We passed a small group of park rangers on horseback who were patrolling the trails. I am told the park allows no more than 10 feet deviance from a marked trail before a citation may be issued. Good to know if you plan a trip to Antelope Island. There are restrooms (no water) at the parking areas and a ranger station is not far away. Jon mentioned that when the snow gets deep, the White Rock parking area is closed and parking is moved to the ranger station parking area.
Antelope Island is the largest of several islands in Utah’s Great Salt Lake. It covers about 42 square miles. The tallest peak, Frary Peak, rises to almost 4,500 feet above sea level, which amounts to just over 2,200 feet above the Great Salt Lake. There are several trails that are open to equine travel on the island, as well as several loops one can make in a vehicle. From the White Rock parking area there is a trail head with a 7-mile and a 14-mile loop. Some of the trails are closed at certain seasons, such as springtime during the period when antelope are bearing their young, so it is advisable to call ahead to the park service if planning to ride a specific area. The only time deviation from the designated trails is allowed is during the fall buffalo roundup.
For our ride we selected the 7-mile loop, but were enjoying the ride so well when we reached the loop intersection that we all chose to go on and take the 14-mile loop. It was the right decision. The longer loop enters some pretty rocky areas and offers some wonderful views from higher elevations on the island.
My horse was barefoot, but handled the terrain well, although one has to factor in the snow, which I’m sure made a difference. I only felt Ranger wince just a couple times and he never got tender-footed at any time during the entire 14 mile ride. There were several spots on the trail where melting snow had created puddles, which had then frozen, creating a slip-hazzard, as well as the possibility of a horse getting a nasty cut by breaking through the thin ice crust. On one switchback, Scott’s horse slipped and fell on his side, catching Scott’s boot in a stirrup. Luckily, Scott had the presence of mind to keep hold of the reins and was able to bring the horse to a halt with no injuries to him or the horse. Scary, though!
Scott on his Tennessee Walking Horse, Bandit
Also, snow packing into the horses’ shoes was something to be careful of. I took a turn at riding Scott’s TWH, Bandit, so he could take a turn on my new Fox Trotter, Ranger. While working on Bandit’s “stop pedal”, I gave him a “Whoa” command, at which time he dug in his heels…or tried to. Turns out his shoes were packed and he had been walking on a pad of ice about an inch thick. When he dug in his heels they slipped right up under him and he went down on his rump, which promptly projected me onto the trail on my rump! It was rather humorous to all, including myself, with both of us hitting the trail on our rumps. Again, I was bright enough to keep hold of the reins, and so was eligible to ride on to the trailer, rather than walking. I told everyone I was just working on perfecting Bandit’s sliding stop and thought he was doing rather well. I recommend taking along a hoof pick for winter rides.
We arrived back at the parking area about 2:30pm, where we unsaddled and enjoyed a good, hot bowl of chili, compliments of MFTHBA, and good conversation. Met some nice folks, saw some very pretty horses and mules, and some very nice saddles and other tack. All-in-all, it was a great way to spend a New Year’s Day. I hope it is a good omen for the rest of the year. Enjoy the photo gallery.
Ranger and I at Antelope Island, 01/01/2015
If you zoom in on this photo, you will find a large buffalo bull right in the middle
We left the park just before 4pm, after needing Scott, Jon, and Mike to help me get Ranger loaded into the trailer (again, something Ranger and I are going to have to work on) and headed home. We unloaded Jon and Mike’s horses and gear at Jon’s house and headed back home to Salem. I let Scott’s horse off in Pleasant Grove, let Scott off in Spanish Fork, and dropped my trailer and Ranger at his pasture in Woodland Hills, arriving back home in Salem long after dark, at about 7pm, just in time to get a nice New Year’s Day supper with lots of black-eyed peas and ham.
Me, in my cold-weather gear, on my Missouri Fox Trotter, Ranger
It was a very long, but good day for me, and a great way to start the new year.
Here’s to lots of horse trips and lots of blog entries in 2015!
P.S.
For those of you still wondering about my Mexico-to-Canada trip, Dad and I are making plans for at least the first two legs of it, from the Mexican border to Panguitch, Utah for this spring. We hope to depart from near Douglas, Arizona on or about April 1st, arriving at Eagar, AZ about three weeks later. That leg will be about 275-300 miles, much of which is already familiar terrain to us. At that time we will evaluate our horses, equipment, tack, and ourselves, to decide whether we can make the next leg, from Eagar to Panguitch this year. If we feel like we can do it, we will rest a couple weeks at Eagar, make the necessary adjustments, and head out around the first week or so of May. The second leg will will be about 500 miles, will follow the Arizona Trail through the Grand Canyon, and end up at Panguitch, where Dad was born and raised. As close as I can figure, it should take us about 5-6 weeks for that leg.

 I found an old abandoned gravel pit not far from where I keep Ranger. It makes a great place for me to work on his mountain trail skills as well as his control skills. So far he’s been impressive. He is extremely sure-footed, quite strong, and very athletic. There are a lot of places to work on steep ascents and descents and the terrain is quite rocky, which will toughen up his hooves. There are also a few long ascents on which I can work on improving his strength and endurance. It’s the perfect training arena for me.
 We also worked a bit on trailer loading. I have started working on that at the end of every ride. Seems that he is more in a training mind-set when we get back than when we start. After the ride, once I load him into the trailer I feed him a little and let him rest while I brush him. He is beginning to be much less resistant. I think another week or so will have him walking into the trailer unassisted, which is what I’m looking for.
 One other thing I learned today about Ranger. He is so short-coupled that when we are ascending a steep trail, I have to pull my heels back and up out of the way or my spurs will hit his stifles. He really pulls those back legs up under him when he’s ascending. Never had that happen with a Quarter Horse.


You must be logged in to post a comment.