

Thought I’d take a few minutes this morning to type up a gear report on one of the pieces of gear we took that truly proved its worth and durability on our 355 mile horse pack trip through the rough country of southeastern Arizona: Our Goal Zero solar chargers.
As you might recall from a previous post, I bought two solar chargers made by Goal Zero – a Guide 10 and a Nomad 13. The Nomad is the larger of the two panels, producing up to 13 watts of electricity, while the Guide 10 produces up to 10.

The reason I bought the Guide 10 to supplement the Nomad was that it comes with a rechargeable battery pack of four AA batteries that can be used as an emergency power source to recharge our other electronic devices when no sunshine is available.

When I first purchased the chargers I was quite concerned about their durability. They are flat-panel solar panels covered by a tough nylon-canvas material with a clear plastic cover over the solar cells. They both have a zippered pocket on the back, where cords and adapters may be stored. I am pleased to report that these panels have survived the first leg of our trip. 355 miles of the toughest terrain I have ever ridden over.
As I felt I needed to keep these panels accessible at all times, as well as the need to protect them from damage, I kept them in my saddle bags for the entire ride. My original intent was to strap them to the top of our pack saddles, so we could charge batteries and devices as we traveled. However, after our first day out, I let that idea die. We passed under so many low branches of mesquite, ironwood, juniper, ocotillo, and cactus, that I’m pretty sure they would have sustained damage had I tied them to our pack saddles.

What I ended up doing for most of the trip was to set the panels out each morning and evening to catch as much sunshine as possible. Often, we made camp after the sun was low on the horizon, so I didn’t get a lot of charging done in the evenings, but I generally got several hours of good charging time each morning as we broke camp. My solar panels were the last thing to be packed before mounting up.
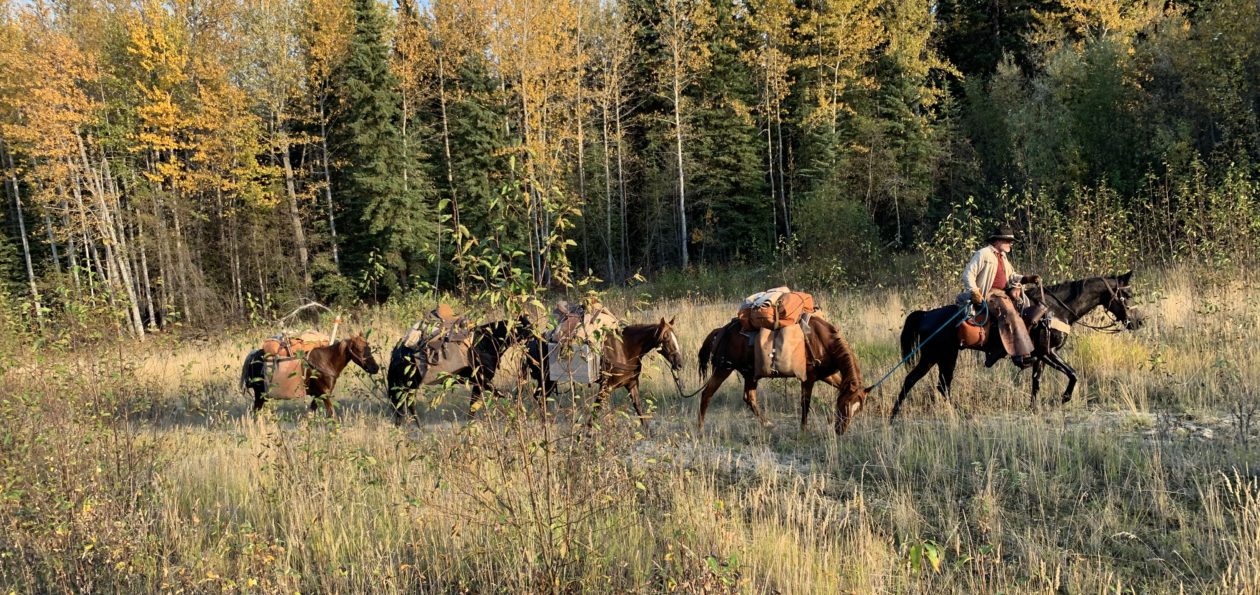
About the second week, we had a spell when there just wasn’t enough sunshine to keep our batteries charged, partly due to our traveling through trees in the Chiricahuas. I ended up one day with all my GoPro camera batteries discharged, my iphone dead, and my DeLorme Explorer GPS almost dead. Out of necessity I tied the Nomad 13 to the back of my saddle as we traveled in open country from the Chiricahuas to San Simon, AZ.  The canvas cases for both units have small loops along outer borders which serve very well for tying them by saddle strings over my coat behind my saddle. While it did not charge very efficiently, due to not being able to always have it directly facing the sun, it was enough to get my iphone up to about a 30% charge after several hours. After that, whenever we traveled in open country I tied the Nomad to the back of my saddle and connected something to it, be it my iphone or the Guide 10 battery pack. In that way we were able to keep the most critical devices with at least a minimum charge the whole trip.
Another benefit of having both the Nomad and the Guide 10 was that the two can be connected together, or “daisy-chained”, by connecting the built-in cables, to increase their charging capacity. This greatly decreased the amount of time needed to completely recharge a device or top one off. When I set the panels out each morning or evening, they were daisy chained and I took pains to make sure the panels were situated to take maximum advantage of what sunshine was available. I found that even on cloudy days, there was sufficient sunshine to produce a trickle of electricity to get some charging done.

The item I always gave priority to keep at full charge was the battery pack. The battery pack contained four rechargeable AA batteries and had sufficient depth to bring my iphone 6 from dead to about 95% charge in a matter of about 3 hours. At that point the battery pack would be completely dead. I would make sure it was brought to full charge the following morning. My reasoning for this was that my iphone was the second most important electronic device in our inventory. It communicated with my DeLorme Explorer and provided viewable topographical maps by which we guided ourselves much of the time. Since we didn’t get all the paper maps we should have, we were very reliant on the iphone to keep us going the right direction, particularly at forks in the trails. It also served as a camera for still shots and the occasional short video when I didn’t have the GoPro out and ready. The battery pack gave us some insurance against days without sun and was used a number of times to keep the iphone alive until it could be charged by the solar panels.

One end of the battery pack has a well organized set of power inputs and outputs, as well as an indicator light and LED flashlight function. The USB power output allowed us to use the regular USB charging cords for charging all our devices. The inputs allow charging from the solar panels via a built-in cord or from a 110V wall outlet via a USB charger. When the battery pack is discharged, the indicator light shows solid red. As it charges it shows a blinking red light, which changes to a slow-blinking green, then a faster-blinking green, then finally a solid green when fully charged. The same indicators show as it discharges while charging a device. There is an on/off switch on the left side which also turns the LED flashlight on and off. While I never needed the LED flashlight, I can see where it might come in handy on occasion. The pack also comes with an adapter to recharge AAA batteries. The reserve power of the battery pack was a very important asset for us on the pack trip. In fact, I am considering purchasing a second battery pack.
The most important device we had was, of course, the DeLorme InReach Explorer, however the settings I had in place on it kept it going for up to five days before hitting the critical 20% charge level. Not only that, but it would come back to full charge within about two hours, when connected to both panels in direct sunlight. So, one good morning would have the GPS set to go for nearly a week.
I made sure all our devices were turned off each night and not turned back on until needed the following day. By doing so, and by ensuring that I set the two chargers out each morning, along with the additional charging time on the back of my saddle, the two solar chargers kept all our devices with at least a minimum charge the entire trip, except that one day when I let things get discharged. That one day taught me to become more diligent and organized in keeping things charged and utilizing the sun when it was shining. Additionally, as we took a rest day every Sunday, the solar panels were set out all day and adjusted periodically to maximize their effectiveness in the sunshine, while charging all our devices to maximum capacity (that is, when the sun was actually shining).
As for durability, while stored in my saddlebags, along with a number of other items – flashlights, binoculars, odds and ends, etc – these two solar charges survived multiple instances of my saddle horse laying down and attempting to roll over. I can’t think of many more effective ways to prove the durability of these little panels. After the trial they have been through, I am satisfied that I will have them for many, many more miles into the future.

The only thing I have found that would improve the durability and effectiveness of the Goal Zero solar chargers, in my opinion, would be to have a piece of flanel cloth, or similar material, cut to the size of the panels to keep between the clear plastic panels when the units are closed. I found that the clear plastic face of my units became scratched and had a somewhat fogged appearance in places, from the dust that got between them and scratched the surfaces while closed. I’m sure that decreases their efficiency, although I don’t know how much. This little improvement is something I will do for future use. I intend to recommend this as an improvement to the manufacturer.
My overall evaluation of the Nomad 13 and the Guide 10, used both individually and together, and I think I can honestly say they received a baptism by fire, so to speak, is that I consider them to be one of the most critical items of gear we had on the trip. That is not to say they were necessary for our survival, but they were absolutely necessary for the successful outcome of our trip. They proved themselves to be very durable under the most harsh conditions, surviving some pretty rough treatment and kept our critical electronic devices with at least a minimal charge throughout our month-long trip, thus ensuring we had the ability to contact the outside world at any time and that we were able to photographically document much of our trek for our followers.
Overall grade: A+


You must be logged in to post a comment.