Tag Archives: Decker pack saddle

Days 10-15, Crossing the Desert to Safford

On Day 9, Sunday April 19, Dad and I had spent the day in camp at the mouth of Whitetail Canyon. Feeling refreshed, both in body and spirit, and the horses and Clancy being well rested from a day of rest, we were ready for the trip across the desert to Safford, Arizona.  Joshua Jensen and Al Smith, our capable guides through the Chiricahuas, had left us with a new supply of 200 pounds of Equidyne pelletized alfalfa for the passage across the desert. The saddle sores that had been starting to show on Daisy’s back were healing up after four days of being ponied bareback. We were in good shape. Our only concern now was being able to find water. We had about 80 miles across some very flat, dry desert country before we reached our next destination, Joshua’s place in Safford.

We had a good morning and it looked like for the first time we would be able to make an early start. Just as we were getting ready to mount, a fellow wanders into camp and we get to chatting. It was interesting conversation. The fellow was a local conservationist and birdwatcher. I neglected to take down his name and have forgotten it. It was he who had made the rock cairns we tried to follow on Saturday. Anyway, we talked too long and didn’t make it out of camp again until about 9:30am.

I was riding Lizzy, and, as usual, she set a pretty good pace for us. We left the mountains and joined Nolan Road and headed north, keeping just off the road to avoid vehicular traffic. Our goal was to reach San Simon, where we would cross under I-10 and find a place to make camp.

Somewhere along the route between Whitetail Canyon and San Simon on Nolan Road, we passed the 100-mile mark of our trip.

About half way to San Simon we found a water hole where we took a break and let the horses graze on some nice grass we found there, while Dad and I ate our lunch. For the entire trip our lunches consisted of a few bites of beef jerky, a Cliff Bar, raisins, and a bit of trail mix. We seldom stopped for lunch, usually eating a little at a time as we rode. As small as our lunches were, it was sufficient and we fared well. We were definitely hungry by the time we made camp in the evenings, though.

Dinner and Supper!
Dinner and Supper!

Our breakfasts and suppers consisted of dehydrated meals, made from ingredients mixed and matched from a food storage kit we bought from Walmart for the purpose. We had a variety of vegetable soup, creamed potato soup, corn chowder, and various combinations of those. Breakfasts included dehydrated eggs, the occasional packet of oatmeal, potato shreds, and some bacon bits. We cooked everything over a single coleman burner on a small propane can. Quite frankly, I don’t remember well what we ate most of the time. I’m sorry to say that some of the food wasn’t all that appetizing. Dad and I lost quite a bit of weight on the trip. I think the thing we missed most, in our suppers and breakfasts, was the fact that the dehydrated food kit included absolutely no meat! The imitation meat was also imitation tasty.

By nightfall, after 22.6 miles on the day, we made San Simon. We stopped by a ranch house, and finding nobody home, we helped ourselves to a spigot to water our horses and fill our canteens. We met a good friend of the rancher the following day, who happened to stop by for some friendly conversation, so we passed on our thanks for the use of the water spigot.

Finding no good place for a camp, we pulled off into a thicket that offered some concealment from the locals and made a dry camp. It was dusty, dirty, and full of thorny brush. We hit the hay early and departed early as well. Josh and Al stopped by in the morning on their way through town and helped us get loaded up and started. We then went back to the ranch where we watered the evening before and watered our stock. On our way back into town we ran into the fellow I mentioned above, Ron Mahan, who was able to give us some good directions for getting us into a wash, the San Pedro River, and under I-10 without having to concern ourselves with road traffic.

A nice pond in the desert

On this day we headed up the San Pedro River bed (otherwise known as a dry wash), which ran generally in our direction. We stuck to that for several miles, but knew we needed to find water for the horses. We struck a road heading east-west that Mr. Mahan had told us about. We followed it west about a mile and found two or three houses and a very nice pond. The pond had bass and panfish in good numbers. I suspect the locals had stocked the pond for their own fishing and eating pleasure. Strangely enough, our horses weren’t very thirsty. We left there and got back into our wash and continued northward.

As we were passing through a part of the wash that was thick with brush, I heard a muffled grunting and looked around to see what it was, knowing the area was prime for Javelina. I spotted a little pig no larger than a small puppy rooting and playing in the grass. We tried to get a picture of it, but the darn thing was so well camouflaged that when we saw the pictures we couldn’t find the little Javelina in it! The mother was nearby, so we let them be. An angry javelina is nothing to mess with. We moved on.

Shortly thereafter the wash became rather problematic to follow. It became deep, to where we could no locate ourselves with regard to the mountains and we could not see to find the next waterhole we were aiming for. It was also so choked with mesquite that it was tough, and painful, to get through in places. We climbed up out of the wash and began to head overland on higher ground.  Once on top, we spotted in the distance what looked like a cottonwood tree, which often indicates a well or water hole, so we headed that way.  It was, in fact, a cattle watering tank, but it hadn’t been maintained in a few years. It was choked with algae and moss. The horses drank from it, but not deeply. They didn’t like it.

Camp at Butte Well
Camp at Butte Well

By nightfall, we had again traveled about 18 miles. We camped that night at Butte Well, located just about a half-mile east of Orange Butte. There was a decent water trough for the horses, but nothing for us. Again, the water was full of green algae. At this camp we had to watch for cactus, because there was a low-growing species of prickly pear that you really had to watch out for. This area was very dry, with few trees even tall enough to tie the horses to. Again, not a very hospitable camp. This day, Clancy’s feet got pretty sore and I ended up with him on my saddle for several miles. The mileage we were making was getting to him. I ended up with him on my saddle quite a bit over the following few days. That night I checked his paws and found a mesquite thorn about 3/8″ long stuck all the way up in one pad.

The following morning I attempted to filter some of the water from the trough, with my Katadyn gravity-feed water filter, to fill our canteens. Lesson learned: Don’t try to filter filthy water! The algae plugged my filter before I had gotten a quart of drinkable water. That was a problem, since we didn’t have a spare filter. That meant we had no means of replenishing our drinking water until we reached Safford, another 40 or so miles farther along the trail. Well, we could have boiled water in a pinch, but that takes propane and time.

No, he's not dead.
No, he’s not dead.

We got back on the trail the following morning and followed a two-track ranch road westward. About five miles farther along we came to a solar-powered well with running water. We were able to fill our canteens, but the water tasted salty. The horses were fine with it, though. We ended up doing a lot of cross-country bushwhacking that day. It was a long one.  Around lunch time we located another waterhole that was apparently privately owned. There were a few improvements around it, such as a pathway and a small picnic area. We watered there then went a mile or so farther on, where we found some good grass. We let the horses graze for about an hour, while Dad and I ate lunch and rested.

We crossed the San Simon Fan area that day, which is a stretch where the government build low spreader dams to spread out the rain runoff to control erosion and spread the water over a wider area to benefit the local ecology. What it did, however, was to spread very fine silt over a very large area. Here’s a video that shows the area. It took us several hours to cross it. Here’s a video.

We made camp at Bailey Well that night, after having made a total of 21.2 miles. We had hoped to make Tanque, but would have arrived long after dark and we were completely bushed. We were tired!

Bailey Well was another solar-powered well, but we arrived after the sun was setting behind Mount Graham, so we obtained no water for our canteens. Horses were watered well, though. We ran out of drinking water the following morning, having just enough to make a breakfast.

The next day, Day 14, Friday , April 24, we headed north on a dirt road. Safford was about 20 miles away, so we hoped to make it all the way. We made Tanque around noon. We were lucky enough to find it a running well, so we were able to fill our canteens. The water tasted a bit better than the water we got from the previous well.

We followed dirt roads the rest of the way to Josh’s place, which was lucky for us, because it got us through the numerous cholla forests in the area. The cholla was flowering, so it was quite beautiful, but cholla is a true hazard for one traveling by horse. It is also commonly called “jumping cactus” because it grows in clumps, little balls of spines, that break off and stick when one brushes up against them. The plants propagate in this way, so the cactus grows in patches, or forests, as the case may be. We passed by several “cholla forests”.

Josh's place
Josh’s place

We made Josh’s place late that afternoon, after a day of 20.8 miles. It was good to release the horses into a corral and feed them hay. Josh and his family were not home for the weekend, but left us the use of the house. He also left us the use of his pickup, so we headed into town immediately after tending the horses, to look for a water filter for my Katadyne filter. No such luck, so I contacted Outfitter’s Supply in Columbia Falls, Montana, from whom I purchased the filter, and they overnight expressed two filters to me.

That evening, Josh’s neighbors, the Bodines, brought us a home-cooked meal of wild turkey. Their 14 year-old boy, Evan, had killed the turkey during the spring hunt. Jessica Bodine cooked it up with dumplings. It was heavenly!

The best part of the evening, though, were the showers at the end of the day! In order to not abuse the hospitality shown by Josh and his wife, Dad and I made our beds in the garage. We really didn’t want to get their house filthy. We availed ourselves, however, of their washer and dryer. It was wonderful to feel clean and have clean clothing again.

Dad on our mustang, Jimbo

On Saturday morning, the Bodines brought us a very tasty breakfast, Al came to put shoes on our mule, Honey. After he arrived, we headed for town to buy shoes and some other supplies. While we were driving around town, Al took us for a drive to sort of scout out a route past Safford. We located a power line that offered a decent route. While we were scouting, another of those little helps from heaven happened. We met Clay Gomez, who owns a ranch through which that power line runs. He owns the only gate in the fence for many miles. He was very cordial and gave us permission to pass through his gate. When we arrived there later that evening, he had left the gate unlocked for us.

Me on Lizzy, with our string
Me on Ranger, with our string

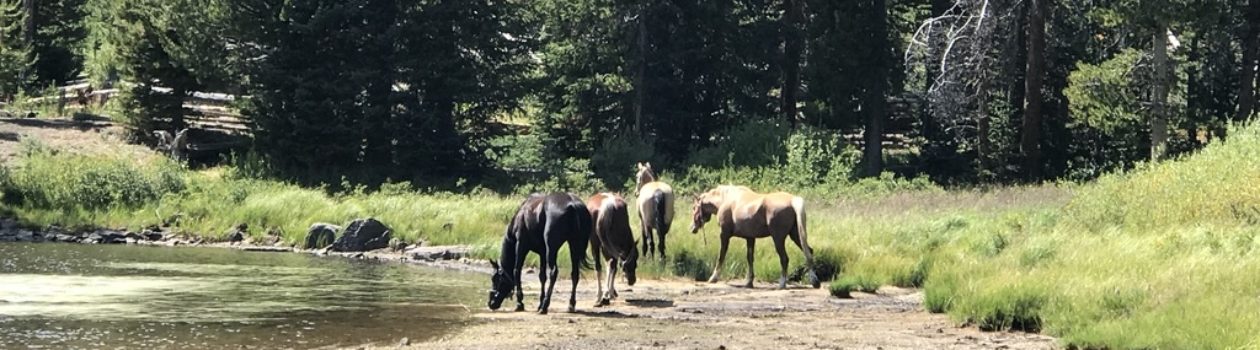
By the time we arrived in Safford, we had traveled about 170 miles.  Our mule, Honey, had been barefoot all that way. She started getting tender on Wednesday, so we had Al put shoes on her. We also re-stocked with the last of the Equidyne feed we had stashed with Josh before we started the trip. Our Katadyne filters arrived via UPS by 9:30am. Amazing! We got ourselves packed up and hit the road about 11:30am.  We followed the power line route, as planned, and made good time. We passed through several fences, but none was locked. We ended up making it about 19.8 miles that afternoon and made camp on the Gila River, just north of a small town named San Jose.

The following day was Sunday, our rest day. We had a nice camp, with water, grass, a place to tie our horses, and a nice spot for our bedding. It was a good day to pass the Sabbath. We needed it, as the mileage we made over the past few days was starting to show on the horses. They needed a rest. So did Clancy. So did we.

Stay tuned for days 16 and 17 later this week, and some trail stories you are sure to enjoy.


Posted a couple new videos to my youtube channel…

I just posted a couple new videos to my youtube channel (it’s under “Tony Henrie”).

The first is a blurb about our experience on the trail with regard to horse packing with both Decker-style pack saddles and manties and with the traditional crossbuck pack saddles and paniers, sometimes called Utah Paniers.

We found manties to be more versatile when packing odd-shaped items or a lot of odds and ends, but we found them to be a lot of extra work in comparison to using paniers. Our choice for the style of packing we do:  Paniers and crossbucks.  Our Decker pack saddles are configured to use either paniers or manties.

The video was taken about 19 days into the trip. We were near the Double-C Ranch, south of Clifton, Arizona in an area they call the Black Hills.

Link:  https://youtu.be/bScARJuW-zc

The second video is a short view of a steep portion of the Crest Trail in the Chiricahua Mountains, coming down through the Painted Rock passage. The video really doesn’t give much of a true perspective on just how steep that section of trail was. Keep an eye on how short the switchbacks are. The grandeur of the view off both sides of the Chiricahuas from the range’s own backbone was really something to see. I had to take the video with my iphone6, because my GoPro Silver ran out of battery about ten minutes before we descended this section.

This was about Day-6 of our trip. Many thanks to our guides, Joshua Jensen and Al Smith. We never would have made it through the Chiricahuas without their help.

Link:  https://www.youtube.com/watch?v=gQOxxNXNplQ

I have been reviewing and preparing to edit the all the video footage from our trip. This is not going to be an easy project. I expect it will be easier once I figure the software out. I’m also finding it hard to edit the videos. I just want to watch it all!  Even the slow, boring parts hold meaning and excitement for me. Don’t worry. I’ll cut them down to a reasonable size and still catch all the best parts.

Stay tuned.

Pack Saddles Review, based on our experience…

Those of you who have been following my blog awhile know that I did quite a bit of research on various configurations of pack saddles before finally settling on the Decker-style Phillips Formfitter pack saddles, from Outfitters Pack Station, for our Mexico-to-Canada horse pack trip. As Dad already had two crossbuck pack saddles, we ended up using my two Deckers with manties and Dad’s two crossbucks with Utah-style paniers. It’s time for my comparison and evaluation.

Crossbuck pack saddle tree

To provide a little background, crossbuck pack saddles, sometimes called sawbuck pack saddles, have been used in North America for at least a couple hundred years. They consist of two crossed wooden “crutches”, similar to the way a sawbuck is built, which is where the name comes from (a sawbuck is two crossed beams over which a log is laid to be cut with a saw). Paniers, which are large bags or hard-sided boxes, are hung by straps from the crossbucks. Traditionally, soft paniers, often called “Utah Paniers” were used. These paniers are often covered with a tarp, which is tied in place with a diamond hitch, which improves the water-resistance of the pack and holds items tied on top of the packs.

IMG_1184While hard-sided paniers are available and quite utilitarian, we decided to go the traditional route. That’s what Dad and I have always used and we saw no reason to change. However, during our passage through the Chiricahua mountains, one of the riders who joined us for a few days packed hard paniers on his mule and I was much impressed. In camp, these hard paniers could be converted into seats or tables. I expect I’ll eventually get a set of these and give up on my traditional bent. Also, there are bear-resistant hard paniers available from a number of suppliers, for those areas where they may be required.

Sometime around the turn of the 20th century, a new-style of pack saddle was invented, which is now commonly called the Decker-style pack saddle. The Decker pack saddle, characterized by metal bows, or arches, to which loads are strapped, has proven its usefulness over the past century, due to its versatility. hqdefault One can hang about any kind of load imaginable from a Decker-style pack saddle with a little ingenuity. This style of pack saddle eventually became the standard in the northwestern United States, while the crossbuck has remained king in the southwestern U.S.. Why this is so, I think I discovered during our pack trip and I will discuss that in another post.

2015-04-28 15.35.38
Our mustang, Jimbo, with the mantied load on a Phillips Formfitter pack saddle

For the kind of loads we carried on our pack trip, manties are used to contain the cargo, which are then tied to the Decker pack saddle. Manties are heavy canvas tarps, normally measuring about 7 X 8 feet, in which the cargo is wrapped and tied into a pack. One manty pack is tied to each side of the pack saddle to balance the load. Manties of uneven size and/or weight may be balanced by adjusting the way they are tied to the saddle. While top packs may be tied to these pack saddles, it is not commonly done, however the manties may be tied as large or small as required.  The pack saddles I finally settled on have arches that are made to handle not only manties, but also Utah Paniers.

Phillips Formfitter
Phillips Formfitter

The Phillips Formfitter pack saddle also has other features that attracted me, such as the adjustable-angle saddle bars and the fleece pads attached to the bars. My reasoning for this selection was that the adjustable bars would answer the problem of the different conformations of the several horses on which we intended to use them. Our remuda consisted of two Missouri Fox Trotters, two Quarter Horses, one mustang, and one mule, ranging from 16 hands to 13, all with very different backs among them.

My concerns with regard to this pack saddle were limited to two things: Would the adjustable saddle bars be able to hold the pack loads in place like a solid pack saddle would? And, would the narrow saddle bars, configured similar to a riding saddle’s bars, sufficiently distribute the loads on the horses’ backs, so as to avoid pressure points and saddle sores?

Before the trip, I discussed these and other concerns about the pack saddles with Wade, at Outfitters Pack Station. We also discussed whether double cinchas, such as are commonly used on crossbuck pack saddles, might be better for our trip. I decided to go with the single cincha, since that is the configuration I have seen on most Decker-style pack saddles. I figured that if they proved insufficient, I could order the double cincha rigs at the end of the first leg of our trip. On the Phillips Formfitter, the cincha rigging is changeable by simply unbuckling one and replacing it with the other. Wade also gave me some advice on setting up the rigging to ride properly on the pack animal.

During the first 200 miles or so of our trip, we knew we would be packing feed for the horses, since there is little feed available for grazing along our route in the lower desert areas of Arizona. We decided on Equidine pellets in 50 pound sacks, as it would be easy to pack in manties and to balance as a load. We started our trip with 400 pounds of feed, split among two pack horses, packed in manties on my Phillips Formfitter pack saddles. With the help of friends, we were able to re-supply with feed as needed. The rest of our gear was packed in paniers on Dad’s crossbucks. Our plan was to have two animals under riding saddle, two packed heavy, and two packed light, then rotate every day or so to keep all the horses adequately rested. We also planned for two rest days per week. On the first day, all the animals were packed pretty heavy, but the feed went down at a rate of nearly 120 pounds per day, so the packs lightened up quickly.

I set my pack saddles up according to Wade’s advice, however, both Dad and I felt the 3/4″ wool felt pack saddle pads we had were insufficient for the loads we were packing on the horses. We decided to place a regular saddle pad over top of the pack saddle pad for extra protection for the pack animals’ backs.  As it turned out, that was a mistake with the Phillips Formfitter.

The first day we made approximately 10 miles. In that distance we had to re-settle the decker pack saddles several times. I was beginning to believe I had made a serious mistake in not ordering the double cinchas. By the end of the second day, in which we made over 16 miles, we had stopped and re-settled the Decker pack saddles a number of times. It seemed they would start to turn every several miles, regardless of how well balanced and tied the load was, or how tight the cinch was. We had no such problems with the crossbuck pack saddles, which were padded in the same way.

Saddle sore on the QH Daisy

By the end of the second day, our large, heavy-built Quarter Horse mare had developed a saddle sore high on her withers. After looking at the location of the saddle sore and considering how often we had to re-settle her Decker pack saddle, we determined that we had over-padded the pack saddles, causing them to “woggle” on the horses’ backs. After that, we packed the Phillips Formfitter saddles without the additional saddle pads and had no further problems with the saddles turning or with saddle sores on any of the other horses. After that point, the Formfitter pack saddles stayed in place with the single cincha and performed very satisfactorily. Lesson learned: Do not over-pad with these pack saddles.

Incidentally, we continued to double-pad the crossbuck pack saddles on the mule and one Quarter Horse and had no trouble with the saddles turning or saddle sores.

I was very pleased with the quality and adjustability of the rigging on the Phillips Formfitter pack saddles. I was able to make the saddles fit properly on my 16-hand, tall-withered, short-backed, tall-spined, deep-chested, bony-hind quartered, Missouri Fox Trotter gelding, as well as the 15-hand, long-torso, flat-backed, broad-chested, wide-rumped, Quarter Horse. As for the mustang, he was fairly in-between the other two and we had no trouble at all with fitting the pack saddles to his conformation.

The one horse that had problems with the Phillips Form Fitter rigging was my 4 year-old Missouri Fox Trotter mare. This mare, Lizzy, has a walk to die for under saddle, but it is that same walk that makes her unsuitable as a pack horse. Her long-strided, swinging walking motion caused her to get rub sores from both the breast strap and the breeching, despite the fact that Wade makes those straps with the edges rolled with a light, soft leather. I found Lizzy also got rub sores from my riding saddle breast strap, so it wasn’t the pack saddle rigging at fault, but simply that my mare has such movement in her strides that she simply gets rub sores. Consequently, Lizzy spent more time than anticipated under my riding saddle with the breast strap stowed in the packs. My other Fox Trotter, Ranger, had no such problems and ended up under the pack saddle more than planned.

IMG_0979
On the Fox Trotters, we had to set the spider way up on the croop to avoid rub sores

The one piece of rigging on the Phillips Formfitter saddles that caused problems on both Fox Trotters, was the spider, which is the piece that holds the breeching in place on the croop of the horse. It should ride about half-way between the point of the croop and the horse’s tail. This piece had rubbed deep sores on both my Fox Trotters’ rumps before I noticed it. I had to adjust the spiders so that they rode right on top of the horses’ croop to alleviate the problem.  When adjusted as it is supposed to ride, the motion and conformation of the Fox Trotters caused the front edge of the spider to dig into the hair and subsequently the flesh of the horses. I think this problem could be remedied with a slight re-design of the spider. The spider is made with two layers of heavy leather with fairly sharp edges. I think a fleece pad under the spider, a different shape, or possibly rolled edges like the breast strap and breeching have, would fix the problem. I must say, however, that the only horses that experienced this problem were the Fox Trotters. The Quarter Horse and the mustang had no problem with the spider, or any other part of the rigging, as-is. I intend to design a removable fleece pad for my saddles, for use with my Fox Trotters.

The Packer's Field Manual, by Bob Hoverson
The Packer’s Field Manual, by Bob Hoverson

I used the book “Packer’s Field Manual,” by Bob Hoverson, as a guide for setting up and using my Decker pack saddles. I found his book to be quite complete and useful. I learned to tie up manties quickly and well, using the knots and hitches he shows in the book. I set up each pack saddle with two “sling ropes” of about 28 feet length attached to the front saddle arch with a loop. Each rope runs through the rear hoops and is looped around each pack in a way that suspends it solidly from the saddle arches. The packs are weighed and balanced using a pack scale before loading, however, if one pack ends up slightly larger or heavier, balance can be achieved by setting the heavy pack a little higher on the saddle, thus changing its center of balance and making the load to ride balanced.

2015-03-23 10.04.05Decker-style pack saddles differ from traditional crossbucks not only in the way they are made, but also in the way they are equipped. While our crossbucks were pretty bare and light on rigging, the Phillips Formfitters were heavy on rigging. They also, as do all Decker-style saddles, use a protective canvas and wood shield, known as a “halfbreed” or “Arapajo”, apparently named for one of the men who originally designed and used this type of pack saddle. The halfbreed is a canvas layer that fits over top of the Decker pack saddle and has sideboards of 1 X 4 pine that protect the horse’s sides from the packs and spread the load. This is particularly important when packing items such as lumber, fence posts, or gravel. By the time we finished the first leg of the trip (355 miles), both Fox Trotters and one Quarter Horse were starting to show the beginnings of saddle sores where the side boards rode against their sides from the heavy loads of the feed sacks. The mustang, on the other hand, showed not a single mark…anywhere.

The Phillips Formfitter pack saddle is made with a leather skirt covering the saddle bars, with wool fleece on the underside. This fleece is intended to increase the padding and keep the saddle in place better. In comparison, our crossbuck pack saddles are simply made of wood. For the most part we had no trouble with the Phillips Formfitter staying in place…at least once we learned not to over-pad them, however, on our mustang we had a problem with the saddle pad crawling out from under the pack saddle. We had to stop and reset his saddle at least twice during the trip to move the saddle pad forward. We did not experience this on any other horse.

One of our crossbucks on Honey

IMG_1357Again, our crossbuck pack saddles were very sparse on rigging. Just a strap for the breast strap and a couple more for the breeching. They were simple to place, rig, load, and remove. They caused no saddle sores on any of the animals, and never threatened to turn and dump a load, despite our mule’s propensity to roll every time we stopped for a rest. We used the crossbucks on both of the two Quarter Horses and the mustang with similar results. Having said that, I must also add that the heaviest load we ever put on the crossbuck pack saddles was about 170 pounds and they often carried under 150, whereas our Phillips Formfitters were often loaded with up to 200 pounds of feed.

One problem we had with Dad’s old pack saddles was the fact that they are both in dire need of having all the leather replaced. Still, they made it through our trip with only one broken strap – a breast strap, which we repaired with a piece of nylon webbing we found along the trail.

Over the 28 days, Dad and I tried to streamline our morning camp-breaking ritual a number of ways, but we found that with four pack animals, and having to pack our camp and make up four manty packs and four paniers, we simply could not do it in less than about four hours. We discovered that packing the paniers was a simple matter of placing things in the bags in a fairly even manner, then weighing each panier with the pack scale and adjusting as necessary, normally a matter of removing an item from the heavy panier and placing it in the light one. Making up manties, on the other hand, was a matter of building two manties at one time, so that we could estimate that each would be fairly equal in size and weight, then wrapping each one and tying it up. Then, after they were completely done, weighing them to make sure the two packs were within one pound or so of each other. If they were significantly different in weight, they were unpacked, adjusted, and repacked. It was easy to balance them when a pack consisted of one or two bags of feed, but when they contained items of camp gear, after the feed was used, then it was a pain. Additionally, tying up the manties is very hard on the hands. The canvas and rope chafed and rubbed my hands to the degree that it became quite painful for about the first two weeks of the trip, until my hands toughened up.

The one thing we found handy about the manties was that we used the canvas tarps as a ground sheet and bed cover (we prefer sleeping out in the open and did not take a tent). By the end of the trip we had decided that for our kind of pack trips, mantying was simply an unnecessary chore. I can see how they would be the way to go for an outfitter with odd-sized items to pack, but for us, it just isn’t practical.

Utah-style paniers on a Phillips Formfitter pack saddle

For the last three days of the trip we decided that we would go with two pack animals and send one crossbuck pack saddle and one Phillips Formfitter home with our two mares. We also decided that mantying packs was a tedious task we could do without. We finished our trip using four paniers, two of which hung on either side of a Phillips Formfitter pack saddle.

In the final analysis, after 355 miles and 28 days on the trail, we learned that while Decker-style packing is very versatile, making up four manties every morning was terribly time-consuming, tedious, and very hard on the hands. Yes, Decker-style packing is versatile, but panier-style packing is much easier and takes less time and effort to pack, unpack, and load on the pack animal. Even with a cover and diamond hitch, the paniers were easier to pack than the manties. Hard paniers would be an even simpler option.

As for my Phillips Formfitter pack saddles, I am pleased with them and they performed well – once we learned the lesson about over-padding them. They are very well made, both with regard to materials and workmanship.  However, I cannot say they out-performed the old traditional crossbuck pack saddles. Though, had we loaded up the crossbucks with the weights with which we loaded the Formfitters at times, things might have been different.

I will continue to use the Phillips Formfitter pack saddles due to their adjustability and versatility, but I will use them with paniers unless it is absolutely necessary to use manties. They will go with us when we start again next spring.  While we had two horses that experienced saddle sores and rub sores, I cannot blame that on the pack saddles and do not believe they are at fault. These saddles allow me to choose between panier packing, with both soft and hard paniers, or to go with manties for odd-shaped loads.

For the type of horse packing Dad and I do, panier packing will remain our standard. Consequently, as far as utility is concerned, it is a wash between the Decker and Crossbuck pack saddles. While the Deckers are definitely more versatile in the ways they can be packed, we will be using them for handling paniers, which the crossbucks are specifically made for and do very well. Knowing what I know now, I would choose a standard crossbuck pack saddle over a standard Decker pack saddle for the kind of packing I do.

As far as the Phillips Formfitters are concerned, the quality of workmanship and materials, and the adjustability of the rigging and saddle bars are important to me and I remain pleased with them. I will use them pretty much as I would use a crossbuck pack saddle in the future, but will still have the added versatility when needed. In my opinion, the price tag of $699 for a fully outfitted Phillips Formfitter pack saddle is an excellent value when compared with prices for other brands and styles of pack saddles similarly outfitted. I expect mine will cover many miles on my pack animals before I hang up my spurs.

IMG_1297


Pack Saddles: Crossbuck vs Decker

I’ve been busy remodeling the master bathroom in my house these past couple of weeks. Doesn’t leave much time for messing with the horse or working on the saddles. I’ve been trying to do some research on pack saddles, though, in the early morning and evening hours.

Since I’m going to have to put together two pack outfits for the trip, and likely have a third for a stand-by, I’m trying to decide whether to go with Decker-style pack saddles or the old standard Crossbuck packsaddles.

I have been using Crossbuck pack saddles and Utah-style paniers (big, open grocery sacks made of canvas and other tough materials), since I was in high school, so I had never even considered any other option for my Great Western Trail trip. As I started looking into suppliers for gear, though, I noticed that most of them seem to be carrying Decker-style pack saddles as their main fare and Crossbucks have taken second-seat. So, I have been asking around about the relative advantages and disadvantages of each.

Crossbuck pack saddle and rigging

The Crossbuck pack saddle has been around for a long time. I haven’t been able to come across anything that tells just how long they have been around, but suffice it to say that when one imagines an old miner with his pack donkey, in the pre-Gold Rush days, wandering around the west, dodging indians and avoiding civilization, he had a Crossbuck pack saddle on his pack animal.  The Crossbuck gets its name from its configuration: Crossed wooden “crutches”, normally made of oak or some other hardwood, attached to the saddle bars, traditionally made of Cottonwood, for the horse’s back. The crossed bars looked a lot like a “sawbuck”, which is a fixture made for cutting wood, consisting of two logs or wood beams, bolted or tied together crosswise, across which the wood to be cut was laid to hold it in place.

Modern Crossbucks are solidly glued and/or bolted or riveted to the saddle bars. They are normally rigged for double-cinches and use breast straps and breeching to keep them in place on the animal. An over-sized saddle pad, normally made of mohair or wool felt covered by canvas is used to protect the pack animal’s back. Modern Crossbuck pack saddle bars are carved to fit the animal much like modern riding saddles, however, when one looks at an antique pack saddle, one can easily imagine a sore-backed pack animal. Many antique Crossbuck pack saddles simply had wide, short, flat boards for saddle bars. The rigging of a Crossbuck pack saddle hasn’t evolved much over the years. It is essentially the same as it was 150 years ago.

In the late 1800s, came along the Decker-style pack saddle, which was developed to more easily haul odd-shaped loads while protecting the pack animal. Decker pack saddles were not named for the inventor, S. C. McDaniels, an old Arapajo packer from around the turn of the 20th century, but for several brothers named Decker, who saw the utility of the new style pack saddle and applied for a patent, which, apparently, was never granted. The name Decker stuck, however, and the saddle has had that name since the early 1900s¹.

The Decker-style pack saddle, rather than using wooden crossbucks, has steel bows, arches, or hoops (take your pick as to what to call them) to which the saddle bars are attached. Modern Deckers may have saddle bars made of wood or polymers, and they may be fixed or “self-adjusting”, or able to move to self-adjust to the shape of the pack animal’s back. Deckers have several hoop configurations, to satisfy varying needs of packers.

The original Decker hoops were simply arched hoops connecting the two saddle bars. The straps from the paniers (the bags that hold the loads) are buckled through the hoops, or are attached using Decker hooks.

A Decker saddle uses an oversized saddle pad, similar to the Crossbuck saddle, however, in addition, the Decker saddle uses an Arapajo, or Half-Breed (apparently in honor of McDaniels, who is said to have been part Arapajo), which is a padded canvas pad that lays over the pack saddle, protecting the pack animal, the saddle, and the saddle pad, from the chafing of the loaded packs. The Half-Breed has slits in it, through which the hoops of the saddle protrude, allowing the paniers to be attached over top of it. The Half-Breed also has side boards installed in pockets in the lower sides of if, which help distribute the load across the pack animal’s sides and further protecting it from the chafing of the load.

Many packers also utilize a “Quarter-Breed”, which is a piece of canvas, which lays over the Half-Breed, to protect it from wear and keeping it clean. Since the Quarter-Breed is simply made of canvas, it is easily and cheaply replaced.

Decker pack saddle and rigging

The rigging of a Decker pack saddle is more adjustable than that of a Crossbuck saddle. Most Decker pack saddles I have come across have buckle adjustment available for every strap on it. A Crossbuck saddle’s rigging has few adjustments, outside of the tightening of the double cinches. The Decker’s rigging can be adjusted to move the cinch farther back, or forward, as well as use a single or double cinch. In fact, most of the Decker saddles I have seen come standard with a single cinch. Decker-style rigging appears to be more easily repairable, since it attaches to the pack saddle via D-rings, rather than being riveted or screwed to the saddle, as Crossbuck rigging normally is.

Crossbuck paniers, at least the ones I am acquainted with, have hanger straps that are simply leather or nylon loops sewn into the top edge of the panier. These loops are hung over the crossbuck to suspend the packs. Often there is no adjustment. They just hang where they are. You can adjust the way they hang a little by the way your diamond hitch is tied, but for the most part “they is what they is”, as they say.

Decker-style paniers are more versatile. They may have hanger straps, like the Crossbuck paniers, but they have buckles in them, so as to be able to unbuckle them and pass them through the Decker hoops. They can also be used on Crossbuck saddles, in the same way Crossbuck paniers are used, except that you can loosen or tighten the hanger straps to adjust the way the packs hang. This is useful in balancing a load, when necessary. Decker paniers can also be made, or fitted with, “Decker hooks”, which are brass, bronze, or steel hooks, made to hook onto the Decker saddle hoops. Decker hooks can greatly simplify the loading of a pack animal, particularly single-handed.

Decker hook
Decker hook

Decker saddles also lend themselves, depending on the hoop configuration, better than Crossbucks for “top packs.” While I have always simply loaded stuff on top of my Crossbucks, thrown a canvas tarp over the top, and tied it all into place with a diamond hitch, there are available a number of different styles of top packs, made specifically to load on top of the pack animal and the paniers. Top packs made for Crossbuck saddles are generally configured in an “H” pattern, allowing for the crossbucks. Top packs for Decker saddles are rectangular or square and have no need for the “H” shape, in most configurations, and therefore can have more space in them. Never having used one, I can imagine that it would be somewhat easier to pack and load a square pack than an “H” pack.

As for panier shape and configuration, Decker saddles are easily adaptable for a number of odd-shaped loads, from railroad ties, to hay bales, to regular Utah paniers. I have read of Decker saddles having shelves attached to them to facilitate the packing of lumber and other long, straight goods. While Crossbucks have been used to pack odd-shaped loads, over the years, the Deckers have proven to be more easily adapted and therefore more efficient. The original Decker brothers are said to have amazed many experienced packers with their efficiency in packing hundreds of tons of goods into the back country of Idaho in the early 1900s.


Now for costs. From my research, it appears a fully outfitted Decker-style saddle will run roughly $100 more than a similarly outfitted Crossbuck. The added expense is in the Half Breed and some extra leather in the rigging, with the option of adding a Quarter-Breed, if one wishes. I have recently (as of January 2013) found Decker pack saddle outfits from the low $500 to the mid $600 range, not including freight charges, if any.  A fully rigged (minus cinches) Crossbuck will average about $500, give or take $40 or so. Some sellers throw in a saddle pad with either type, which is nice and effectively lowers the price of the pack saddle outfit.

Now, before I close this post, there has, actually, been some innovation in pack saddles in the past several years. In my research, I came across the record of a patent application from 2003, by a man named Summerfield. He applied to patent a new style of pack saddle that seems to capture all the good of the Decker and Crossbuck saddles and combine them into one. The new saddle, in fact, has crossbucks, but they are made of metal, each having an eye at the top of the crossbuck, to which Decker hooks or ropes can be attached, as well as being configured to allow Crossbuck-style paniers to be hung over the crossbucks.

Summerfield Pack Saddle Patent Application, Google Docs

The Summerfield saddle bars are wider than either the Decker or Crossbuck bars, and are carved to precisely follow the contours of the horse. The saddle rides on an over-sized saddle pad that has pockets on the sides to hold the saddle bars. The pockets have a closure at the top that captures the bars and holds the saddle pad securely in place. The bars appear to be attached to the crossbucks in a manner that allows them to be adjustable, however, they do not appear to be “self-adjusting.” The saddle can be easily configured for either a double or single cinch, just as the Decker can. It appears a Half-Breed and Quarter-Breed could be fitted to the saddle, as well.

I can see where the Summerfield saddle and the Crossbuck might have one failing in common, that the Decker does not share. I have read on two different sites where the author has said that in the event of a “rollover” wreck of a pack animal, the Decker-style pack saddle is much more likely to survive in usable condition than a Crossbuck pack saddle. Due to the configuration of the Summerfield saddle, I would think it might suffer damage from such a wreck.

Having said all that, I have been unable to locate a dealer who carries the Summerfield pack saddle, as yet.

So, I guess the matter comes down to this: Tradition? Do it like my father before me…and with me…or practicality? While I still have leanings toward the Crossbuck (I just like old-style stuff), the practicality and versatility of the Decker-style saddles is winning me over.

Now, being retired, and not being, by any stretch of the imagination, wealthy, I must also consider costs. I have been in this mode for many years, due to a Chief Executive Officer in my home who is an excellent money manager, my good wife (she is the reason I can be retired at all), which has led me, in many instances, to attempt to build things I want. So I am contemplating whether I want to try to build a Decker-style saddle.

I have all the tools necessary. I have the know-how to use all the tools. The Decker-style saddle is quite simple. Much simpler to build than a Crossbuck, if one has the tools to do so. I have the leather working tools to make the rigging as well. The one fly in the ointment, so to speak, is the canvas Half-Breed. I would need to find a supplier who could provide two or three…not two or three hundred…over-sized 1″ thick mohair or wool felt saddle pads measuring about 32″ by 60″ or so. Dad has the sewing machine, back in Arizona. Good excuse to go see him.

So, here we go again. Another project for me to try my hand at. I’m looking forward to it already. I’ll keep you posted.

1. Information regarding the origins of the Decker saddle were taken from information on the Outfitters Supply website. Many thanks to Outfitters Supply for such an informative and well-executed website.

2.  Many of the photographs on this post were taken from outfitterssupply.com website. Others were from Google Images searches.